<Back to Index>
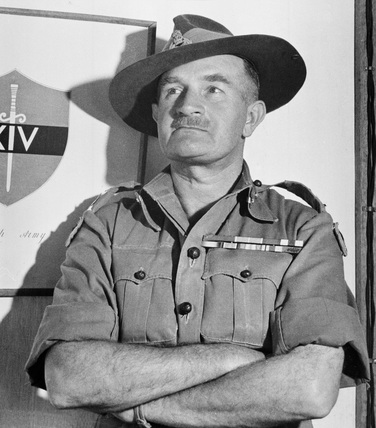
- Commander of the 14th Army Field Marshal William Joseph "Bill" Slim, 1891
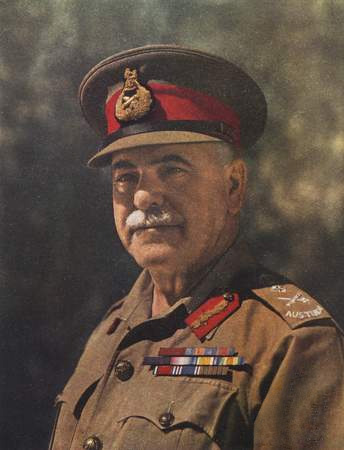
- Commander of the Allied Land Forces, South West Pacific Area Field Marshal Thomas Albert Blamey, 1884
PAGE SPONSOR
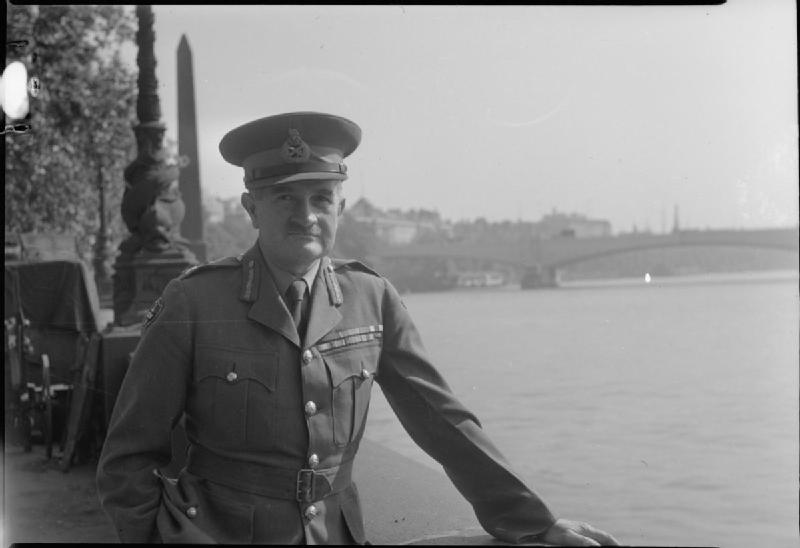
Field Marshal William Joseph "Bill" Slim, 1st Viscount Slim (6 August 1891 – 14 December 1970) was a British military commander and the 13th Governor - General of Australia.
He fought in both the First and Second world wars and was wounded in action three times. During World War II he led the 14th Army, the so - called "forgotten army" in the Burma campaign. From 1953 to 1959 he was Governor - General of Australia, an authentic war hero who had fought with the Anzacs at Gallipoli.
Slim was born in Bishopston, near Bristol, to John and Charlotte (née Tucker) Slim, where he was baptized at St. Bonaventure's Roman Catholic church. He was brought up in Birmingham, attending St. Philip's Grammar School (Edgbaston, Birmingham) and King Edward's School (also Birmingham). After leaving school, he taught at a primary school and worked as a clerk in Stewarts & Lloyds, a metal tube maker, between 1910 and 1914.
He joined Birmingham University Officers' Training Corps in 1912, and was thus able to be commissioned as a temporary second lieutenant in the Royal Warwickshire Regiment on 22 August 1914, at the outbreak of the First World War; in later life, as a result of his modest social origins and unpretentious manner, he was sometimes wrongly supposed to have risen from the ranks. He was badly wounded at Gallipoli. On return to England, he was granted a regular commission as a second lieutenant in the West India Regiment. In October 1916, he returned to his regiment in Mesopotamia. On 4 March 1917, he was promoted to first lieutenant (with seniority back - dated to October 1915). He was wounded a second time in 1917. Having been previously given the temporary rank of captain, he was awarded the Military Cross on 7 February 1918 for actions in Mesopotamia.
Evacuated to India, he was given the temporary rank of Major in the 6th Gurkha Rifles on 2 November 1918. He was formally promoted to captain and transferred to the British Indian Army on 22 May 1919. He became adjutant of the battalion in 1921.
He married Aileen Robertson in 1926 (died 1993), later Viscountess Slim, by whom he had one son and one daughter.
In 1926, Slim was sent to the Indian Staff College at Quetta. On 5 June 1929, he was appointed a General Staff Officer, Second Grade. On 1 January 1930, he was given the brevet rank of major, with formal promotion to this rank made on 19 May 1933. His performance at Staff College resulted in his appointment first to Army Headquarters India in Delhi and then to Staff College, Camberley, in England (as a General Staff Officer, Second Grade), where he taught from 1934 to 1937. In 1938, he was promoted to lieutenant - colonel and given command of the 2nd Battalion, 7th Gurkha Rifles. In 1939 he was briefly given the temporary rank of brigadier as commander of his battalion. On 8 June 1939, he was promoted to colonel (again with temporary rank of brigadier) and appointed head of the Senior Officers' School at Belgaum, India.
On the outbreak of the Second World War, Slim was given command of the Indian 10th Brigade of the Indian 5th Infantry Division and was sent to Sudan. He took part in the East African Campaign to liberate Ethiopia from the Italians. Slim was wounded again during the fighting in Eritrea. On 21 January 1941, Slim was hit when his position was strafed during the advance on Agordat.
Slim joined the staff of General Archibald Wavell in the Middle East Command. He was given the rank of acting major - general in June 1941. He led the Indian 10th Infantry Division as part of Iraq force during the Anglo - Iraqi War, the Syria - Lebanon Campaign, and the invasion of Persia. He was twice mentioned in dispatches during 1941.
In March 1942, Slim was given command of Burma Corps, also known as BurCorps, consisting of the 17th Indian Infantry Division and 1st Burma Division. Slim was made acting lieutenant - general on 8 May 1942. The corps was under attack in Burma by the Japanese and, heavily outnumbered, he was soon forced to withdraw to India. On 28 October 1942, he was appointed a Commander of the Order of the British Empire (CBE).
Slim then took over XV Corps under the command of the Eastern Army. His command covered the coastal approaches from Burma to India, east of Chittagong. He had a series of disputes with Noel Irwin, commander of Eastern Army and, as a result, Irwin (although an army commander) took personal control of the initial advance by XV Corps into the Arakan Peninsula. The operations ended in disaster, during which Slim was restored to command of XV Corps, albeit too late to salvage the situation. General Irwin and Slim blamed each other for the result but in the end Irwin was removed from his command and Slim was promoted to command the new Fourteenth Army — formed from IV Corps (United Kingdom) (Imphal), XV Corps (Arakan) and XXXIII Corps (reserve) – later joined by XXXIV Corps. On 14 January 1943, Slim was awarded the Distinguished Service Order (DSO) for his actions in the Middle East during 1941.
Slim quickly got on with the task of training his new army to take the fight to the enemy. The basic premise was that off-road mobility was paramount: much heavy equipment was exchanged for mule - or air - transported equipment and motor transport was kept to a minimum and restricted to those vehicles that could cope with some of the worst combat terrain on Earth. The new doctrine dictated that if the Japanese had cut the lines of communication, then they too were surrounded. All units were to form defensive 'boxes', to be resupplied by air and assisted by integrated close air support and armor. The boxes were designed as an effective response to the tactics of infiltration practiced by the Japanese in the war. Slim also supported increased offensive patrolling, to encourage his soldiers to lose both their fear of the jungle and their belief that Japanese soldiers were better jungle fighters.
At the start of 1944, Slim held the official rank of colonel with a war time rank of major - general and the temporary rank of lieutenant - general. In January 1944, when the Second Arakan Offensive was met by a Japanese counter - offensive, the Indian 7th Infantry Division was quickly surrounded along with parts of the Indian 5th Infantry Division and the 81st (West Africa) Division. The 7th Indian Division's defense was based largely on the "Admin Box" — formed initially from drivers, cooks, suppliers etc. They were supplied by air — negating the importance of their lost supply lines. The Japanese forces were able to defeat the offensive into Arakan, but they were unable to decisively defeat the allied forces or advance beyond the surrounded formations.
In early 1944, Slim was appointed a Companion of the Order of the Bath (CB). Later in 1944 the Japanese launched an invasion of India aimed at Imphal, hundreds of miles to the north. Slim airlifted two entire veteran divisions (5th & 7th Indian) from battle in the Arakan, straight into battle in the north. Desperate defensive actions were fought at places such as Imphal, Sangshak and Kohima, while the RAF and USAAF kept the forces supplied from the air. While the Japanese were able to advance and encircle the formations of 14th Army, they were unable to defeat those same forces or break out of the jungles along the Indian frontier. The Japanese advance stalled. The Japanese refused to give up even after the monsoon started and large parts of their army were wrecked by conducting operations in impossible conditions. As a result their units took unsupportable casualties and were finally forced to retreat in total disorder in July 1944, leaving behind many dead. On 8 August 1944, Slim was promoted to lieutenant - general, and, on 28 September 1944, he was appointed a Knight Commander of the Order of the Bath (KCB). In December 1944, during a ceremony at Imphal in front of the Scottish, Gurkha and Punjabi regiments, Slim and three of his corps commanders (Christison, Scoones and Stopford) were knighted by the viceroy Lord Wavell and invested with their honors: Slim was presented with his insignia as KCB, the others with their KBEs. Slim was also mentioned in dispatches.
In 1945, Slim launched an offensive into Burma, with lines of supply stretching almost to breaking point across hundreds of miles of trackless jungle. He faced the same problems that the Japanese had faced in their failed 1944 offensive in the opposite direction. He made the supply of his armies the central issue in the plan of the campaign. The Chindwin River was spanned with the longest Bailey bridge in the world at the time. After crossing the Irrawaddy the town of Meiktila was taken, followed by Burma's second city, Mandalay. The Allies had reached the open plains of central Burma, sallying out and breaking Japanese attacking forces in isolation, maintaining the initiative at all times, backed up by air - land co-operation including resupply by air and close air support, performed by both RAF and USAAF units.
In combination with these attacks, Force 136 helped initiate a countrywide uprising of the Burmese people against the Japanese. In addition to fighting the allied advance south, the Japanese were faced with heavy attacks from behind their own lines. Toward the end of the campaign, the army raced south to capture Rangoon before the start of the monsoon. It was considered necessary to capture the port because of the length of the supply lines overland from India and the impossibility of supply by air or land during the monsoon. Rangoon was eventually taken by a combined attack from the land (Slim's army), the air (parachute operations south of the city) and a seaborne invasion. Also assisting in the capture of Rangoon was the Anti - Fascist People's Freedom League led by Thakin Soe with Aung San (the future Prime Minister of Burma and father of Aung San Suu Kyi) as one of its military commanders.
As the Burma campaign came to an end Slim was informed in May by Oliver Leese, the commander of Allied Land Forces South - East Asia (ALFSEA) that he would not be commanding the Fourteenth Army in the forthcoming invasion planned for Malaya but would take command of the new Twelfth Army being formed to mop up in Burma. Slim refused the appointment, saying he would prefer to retire. As the news spread Fourteenth Army fell into turmoil and Alan Brooke, the Chief of the Imperial General Staff, furious at not having been consulted by Leese, and Claude Auchinleck, the C-in-C India who was at the time in London, brought pressure to bear. The Supreme Allied Commander of the Southeast Asia Theatre, Louis Mountbatten was obliged to order Leese to undo the damage. On 1 July 1945, Slim was promoted to general and was informed that he was to succeed Leese as C-in-C ALFSEA. However, by the time he took up the post, having taken some leave, the war was at an end.
At the end of 1945 Slim returned to the UK. On 1 January 1946, he was made a Knight Grand Cross of the Order of the British Empire (GBE) and took the post of Commandant of the Imperial Defence College for its first course since 1939. On 7 February 1947 he was made an Aide - de - camp (ADC) to the King. At the end of his two year appointment at the Imperial Defence College Slim retired as ADC and from the army on 11 May 1948. He
had been approached by both India and Pakistan to become C-in-C of
their respective armies post independence but refused and instead became
Deputy Chairman of the Railway Executive.
However, in November 1948 the British Prime Minister Clement Attlee rejected the proposal by Viscount Montgomery that he should be succeeded as Chief of the Imperial General Staff by John Crocker and instead brought back Slim from retirement in the rank of field marshal in January 1949. Slim thus became the first Indian Army officer to be so appointed. Also in 1948 the United States awarded Slim the Commander of the Legion of Merit.
In September 1949, he was appointed to the Army Council. On 2 January 1950, he was made a Knight Grand Cross of the Order of the Bath (GCB) and later that year was made a Chief Commander of the Legion of Merit by the United States. On 1 November 1952, he relinquished the position of Chief of the Imperial General Staff.
On 10 December 1952 Slim was made a Knight Grand Cross of the Order of St Michael and St George (GCMG) on his appointment as Governor - General of Australia which post he took up on 8 May 1953. On 2 January 1953, he was appointed a Knight of the Order of St. John (KStJ).
Slim was a popular choice for Governor - General since he was an authentic war hero who had fought alongside Australians at Gallipoli and in the Middle East. In 1954 he was able to welcome Queen Elizabeth II on the first visit by a reigning monarch to Australia. For his services to the Queen during the tour, he was appointed a Knight Grand Cross of the Royal Victorian Order (GCVO) on 27 April 1954. Liberal leader Robert Menzies held office throughout Slim's time in Australia. His Official Secretary throughout his term was Murray Tyrrell.
Slim's duties as Governor - General were entirely ceremonial and there were no controversies during his term. However, during his tenure he was patron of the Fairbridge Farms child migration homes in Australia. In 2007 allegations were made by three former residents that as young boys Slim had sexually assaulted them during visits to the farms. These allegations were dismissed out of hand at that time by those who had served under Slim in the army and by his son John Slim, 2nd Viscount Slim. The allegations were aired again on ABC television in the program The Long Journey Home, broadcast on 17 November 2009, the day after the parliamentary apology to the Forgotten Australians.
In 1959, Slim retired and returned to Britain, where he published his memoirs, Unofficial History and Defeat into Victory. On 24 April 1959, he was appointed a Knight Companion of the Order of the Garter (KG). On 15 July 1960, he was created "Viscount Slim of Yarralumla in the Capital Territory of Australia and of Bishopston in the City and County of Bristol". After a successful further career on the boards of major UK companies, he was appointed Constable and Governor of Windsor Castle on 18 June 1964. He died in London on 14 December 1970, aged 79.
- Slim was given a full military funeral at St. George's Chapel, Windsor and was afterward cremated. A remembrance plaque was placed in the crypt of St. Paul's Cathedral.
- The road William Slim Drive, in the district of Belconnen, Canberra, is named after him.
- On 7 September 2008, a plaque in Slim's memory, and those who served with him, was unveiled at the Cenotaph in his native Bristol. Fr Robert King of the Diocese of Clifton was joined by faith leaders from the Hindu, Muslim and Sikh communities at the ceremony, which was led by the Lord Mayor of Bristol's chaplain, the Rev. Prebendary Harold Clarke.
Slim had a unique relationship with his troops - the "Forgotten Army", as they called themselves and despite being very close to defeat at the hands of the Japanese, who had driven them back to the Indian border by 1942, Slim raised training and morale within the ranks. He was also concerned with the health of his troops and the impact of this on their fighting efficiency. In his book, Defeat into Victory, he tells of the malaria rates among his units being 70%, largely due to noncompliance by his soldiers with the foul - tasting quinine medication they refused to take. Slim did not blame his medics for this problem, but placed the responsibility on his officers. "Good doctors are no use without good discipline. More than half the battle against disease is fought not by the doctors, but by the regimental officers."
After Slim dismissed a few officers for high unit malaria rates, the others realized he was serious and malaria treatment was enforced, dropping the rate to less than 5%. The combat effectiveness of his army was thus greatly enhanced. It was this physical and mental turnaround in the army under him that was a contributing factor to the eventual defeat of the Japanese in Burma. Of all the memorials to Slim the one that he would perhaps have cherished most was the impact he made on those he commanded. A half century later, one of them recalled:
"But the biggest boost to morale was the burly man who came to talk to the assembled battalion … it was unforgettable. Slim was like that: the only man I've ever seen who had a force that came out of him ...British soldiers don't love their commanders much less worship them; Fourteenth Army trusted Slim and thought of him as one of themselves, and perhaps his real secret was that the feeling was mutual".
Lieutenant General Sir John Kiszely has recommended Slim's memoirs (Defeat into Victory) describing Slim as "perhaps the Greatest Commander of the 20th Century" and commenting on Slim's "self - deprecating style". Slim discussed his mistakes during the war in detail and lessons learned, which may help explain why his memoirs have never been out of print. Slim's 14th Army was composed of an amalgam of Indian (Hindu, Sikh and Muslim troops), British, African, and other troops; he was on the far end of a long logistical pipeline and generally had the oldest equipment of any Allied army. By all accounts, he was a superb logistician, imaginative in his tactics and operational concepts, and - unusually - very popular with his troops.
As a British commander on the Asian mainland, Slim (and his contribution to the U.S. war effort in the Pacific) has often been ignored in U.S. history books. For three years, Slim's soldiers tied down tens of thousands of Japanese troops in Burma that could have been otherwise redeployed against U.S. forces in New Guinea, the Philippines, Iwo Jima and Okinawa.
Military historian Max Hastings:
"In contrast to almost every other outstanding commander of the war, Slim was a disarmingly normal human being, possessed of notable self - knowledge. He was without pretension, devoted to his wife, Aileen, their family and the Indian Army. His calm, robust style of leadership and concern for the interests of his men won the admiration of all who served under him ... His blunt honesty, lack of bombast and unwillingness to play courtier did him few favors in the corridors of power. Only his soldiers never wavered in their devotion".
The spirit of comradeship Slim created within 14th Army lived on after the war in the Burma Star Association, of which Slim was a co-founder and first President.
A statue to Slim is on Whitehall, outside the Ministry of Defence, was unveiled by Queen Elizabeth II in 1990. Designed by Ivor Roberts - Jones, the statue is one of three of British Second World War Field Marshals (the others being Alanbrooke and Montgomery).
Slim's papers were collected by his biographer, Ronald Lewin, and given to the Churchill Archives Centre by Slim's wife, Aileen, Viscountess Slim, and son, John Slim, 2nd Viscount Slim, and other donors, 1977 - 2001. Lewin's biography, Slim: The Standardbearer, was awarded the 1977 WH Smith Literary Award
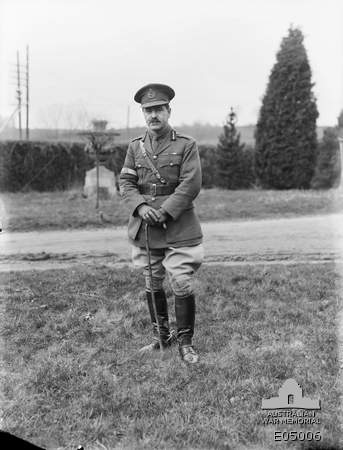
Field Marshal Sir Thomas Albert Blamey (24 January 1884 – 27 May 1951) was an Australian general of the First and Second World Wars, and the only Australian to date to attain the rank of field marshal.
Blamey joined the Australian Army as a regular soldier in 1906, and attended the Staff College at Quetta. During the First World War he participated in the landing at Anzac Cove on 25 April 1915, and served as a staff officer in the Gallipoli Campaign, where he was mentioned in dispatches for a daring raid behind enemy lines. He later served on the Western Front, where he distinguished himself in the planning for the Battle of Pozières. He rose to the rank of brigadier general, and served as chief of staff of the Australian Corps under Lieutenant General Sir John Monash, who credited him as a factor in the Corps' success in the Battle of Hamel, the Battle of Amiens and the Battle of the Hindenburg Line.
After the war Blamey was Deputy Chief of the General Staff, and was involved in the creation of the Royal Australian Air Force. He resigned from the regular Army in 1925 to become Chief Commissioner of the Victoria Police, but remained in the Militia, rising to command the 3rd Division in 1931. As Chief Commissioner, Blamey set about dealing with the grievances that had led to the 1923 Victorian Police strike, and implemented innovations such as police dogs and equipping vehicles with radios. His tenure as Chief Commissioner was marred by a scandal in which his police badge was found in a brothel, and a later attempt to cover up the shooting of a police officer led to his forced resignation in 1936. He later made weekly broadcasts on international affairs on Melbourne radio station 3UZ. Appointed chairman of the Commonwealth Government's Manpower Committee and Controller General of Recruiting in 1938, he headed a successful recruiting campaign which doubled the size of the part time volunteer Militia.
During the Second World War he commanded the Second Australian Imperial Force and the I Corps in the Middle East. In the latter role he commanded Australian and Commonwealth troops in the disastrous Battle of Greece.
In the former role, he attempted to protect Australian interests
against British commanders who sought to disperse his forces on all
manner of missions. He was appointed Deputy Commander in Chief in the
Middle East, and was promoted to general in
1941. In 1942, he returned to Australia as Commander in Chief of the
Australian Military Forces and Commander of Allied Land Forces in the South West Pacific Area under the command of General Douglas MacArthur. On the orders of MacArthur and Prime Minister John Curtin, he assumed personal command of New Guinea Force during the Kokoda Track Campaign, and relieved some commanders under controversial circumstances. During the Salamaua – Lae Campaign he
planned and executed a major victorious campaign. Nonetheless, during
the final campaigns of the war he faced vociferous criticism of the
Army's performance. He signed the instrument of surrender on behalf of
Australia at Japan's ceremonial surrender in Tokyo Bay on 3 September
1945, and later personally accepted the Japanese surrender at Morotai. He was promoted to field marshal in June 1950.
The seventh of ten children, Blamey was born on 24 January 1884 in Lake Albert, New South Wales, near Wagga Wagga, New South Wales. He was the son of Richard Blamey, a farmer who had emigrated from Cornwall at the age of 16 in 1862, and his Australian born wife, Margaret Blamey née Murray. After farming failures in Queensland and on the Murrumbidgee River near Wagga Wagga, his father Richard moved to a small 20 acre (8.1 ha) property in Lake Albert, where he supplemented his farm income working as a drover and shearing overseer. Blamey acquired the bush skills associated with his father’s enterprises and became a sound horseman. He attended the Superior Public School (now Wagga Wagga Public School), where he played Australian football, and was a keen and efficient member of the Army Cadets. He transferred to Wagga Wagga Grammar when he was 13, and was head cadet of its unit for two years.
Blamey
began his working life in 1899 as a trainee school teacher at Lake
Albert School. He transferred to South Wagga Public School in 1901. In
1903 he moved to Western Australia, where he taught for three years at
Fremantle Boys School. He coached the rifle shooting team of its cadet
unit there to a win in the Western Australian Cup. Blamey was raised in a Methodist family
and was involved with his church. By early 1906 he was a lay preacher,
and Church leaders in Western Australia offered him an appointment as an
associate minister in Carnarvon, Western Australia.
With the creation of the Cadet Instructional Staff of the Australian Military Forces, Blamey saw a new opportunity. He sat the exam and came third in Australia, but failed to secure an appointment as there were no vacancies in Western Australia. After correspondence with the military authorities he persuaded the Deputy Assistant Adjutant General, Major Julius Bruche, that he should be given the option of taking up an appointment for one of the vacancies in another state. He was appointed to a position in Victoria with the rank of lieutenant, commencing duty in November 1906 with responsibility for school cadets in Victoria.
In Melbourne, Blamey met Minnie Millard, the daughter of a Toorak stockbroker who was involved in the Methodist Church there. They were married at her home on 8 September 1909. His first child was born on 29 June 1910, and named Charles Middleton after a friend of Blamey's who had died in a shooting accident; but the boy was always called Dolf by his family. A second child, a boy named Thomas, was born four years later.
Blamey was promoted to captain on 1 December 1910, and became brigade major of the 12th Brigade Area. Blamey next set his sights on attending the British Staff College. There were two staff colleges, at Camberley in England and Quetta in India, and from 1908 one position was set aside for the Australian Army at each every year. No Australian officers managed to pass the demanding entrance examinations, although this requirement was waived to allow them to attend. In 1911, Blamey became the first Australian officer to pass the entrance test for examination. He commenced his studies at Quetta in 1912, accompanied by Minnie and Dolf. He performed very well, completing the course in December 1913.
The usual practice was for Australian staff college graduates to follow their training with a posting to a British Army or British Indian Army headquarters. He was initially attached to the 4th Battalion, King's Royal Rifle Corps at Rawalpindi, and then on the staff of the Kohat Brigade on the North West Frontier. Finally, he was assigned to the General Staff at Army Headquarters at Shimal. In May 1914, Blamey was sent to Britain for more training, while his family returned home to Australia. He left India visiting Turkey (including the Dardanelles), Belgium, and the battlefields of the Franco - Prussian War en route. He spent a brief time on attachment to the 4th Dragoon Guards at Tidworth before taking up duties on the staff of the Wessex Division, at that time entering its annual camp. On 1 July 1914, he was promoted to major.
Following the outbreak of the First World War, Blamey was transferred to the War Office, where he worked in the Intelligence Branch preparing daily summaries for the King and Secretary of State for War, Lord Kitchener. Fully trained staff officers were rare and valuable in the Australian Army, and while still in Britain, Blamey was appointed to the First Australian Imperial Force (AIF) as General Staff Officer, Grade 3 (Intelligence), on the staff of Major General William Bridges' 1st Division. As such, he reported to the 1st Division's GSO1, Lieutenant Colonel Brudenell White. In November 1914 Blamey sailed for Egypt with Colonel Harry Chauvel, to join the Australian contingent there.
Along with Bridges, White and other members of 1st Division headquarters, Blamey left the battleship HMS Prince of Wales in a trawler and landed on the beach at Anzac Cove at 07:20 on 25 April 1915. Blamey was sent to evaluate the need for reinforcements by Colonel James Whiteside M'Cay's 2nd Brigade on the 400 Plateau. He confirmed that they were in such need, and the reinforcements were sent.
On the night of 13 May 1915, Blamey, in his capacity as 1st Division intelligence officer, led a patrol consisting of himself, Sergeant J.H. Will and Bombardier A.A. Orchard, behind the Turkish lines in an effort to locate the Olive Grove guns that had been harassing the beach. Near Pine Ridge, an enemy party of eight Turks approached and one of them went to bayonet Orchard, so Blamey shot him with his revolver. In the action that followed, six Turks were killed. He withdrew his patrol back to the Australian lines without locating the guns. For this action, he was mentioned in dispatches.
Blamey was always interested in technical innovation, and receptive to unorthodox ideas. He was instrumental in the adoption of the periscope rifle at Gallipoli, an instrument which he saw during an inspection of the front line. He arranged for the inventor, Lance Corporal W.C.B. Beech, to be seconded to division headquarters to develop the idea. Within a few days, the design was perfected and periscope rifles began to be used throughout the Australian trenches.
In July 1915 Blamey was given a staff appointment as a General Staff Officer, Grade 2 (GSO2), and in September 1915 he was promoted to temporary lieutenant colonel and joined the staff of the newly forming 2nd Division in Egypt as its Assistant Adjutant and Quartermaster General (AA&QMG) – the senior administrative officer of the division. Its commander, Major General James Gordon Legge preferred
to have an Australian colonel in this post as he felt that a British
officer might not take such good care of the troops. The 2nd Division
Headquarters embarked for Gallipoli on 29 August 1915, but Blamey was
forced to remain in Egypt as he had just had an operation for haemorrhoids. He finally returned to Anzac on 25 October 1915, remaining for the rest of the campaign.
After the Australian forces moved to the Western Front in 1916, Blamey returned to the 1st Division as GSO1. At the Battle of Pozières, he developed the plan of attack which captured the town, for which he received a mention in dispatches, and was awarded the Distinguished Service Order in the 1917 New Year Honours. He was considered as a possible brigade commander, but he had never commanded a battalion, which was usually regarded as a prerequisite for brigade command. He was therefore appointed to command the 2nd Infantry Battalion on 3 December 1916. On 28 December, Blamey, as senior ranking battalion commander, took over as acting commander of the 1st Infantry Brigade. On 9 January 1917, he went on leave, handing over command to Lieutenant Colonel Iven Mackay. However, when General Headquarters BEF found out about this use of a staff college graduate, it reminded I ANZAC Corps that "it is inadvisable to release such officers for command of battalions unless they have proved to be unequal to their duties on staff".
Blamey therefore returned to 1st Division Headquarters. Lieutenant General Sir William Birdwood did, however, promote Blamey to full colonel, backdated to 1 December 1916, thereby making him technically senior to a number of recently promoted brigadier generals, that rank being only held temporarily. His division commander, Major General H.B. Walker, had Blamey mentioned in dispatches for this period of battalion and brigade command, although the battalion had spent most of the period out of the line and there had been no significant engagements. Blamey was also acting commander of the 2nd Brigade during a rest period from 27 August to 4 September 1917. On 8 September he was evacuated sick with vomiting and coughing. He was evacuated to England where he was admitted to the 3rd London General Hospital for treatment for debilitating psoriasis on 22 September, and did not return to duty until 8 November 1917. Blamey was made a Companion of St Michael and St George in the 1918 New Year's list, and received another mention in dispatches in May 1918.
On 1 June 1918, Lieutenant General John Monash succeeded Birdwood as commander of the Australian Corps, and Blamey was promoted to the rank of brigadier general and replaced White as the corps Brigadier General General Staff (BGGS). He played a significant role in the success of the Australian Corps in the final months of the war. Blamey remained interested in technological innovation. He was impressed by the capabilities of the new models of tanks and pressed for their use at Battle of Hamel, where they played an important part in the success of the battle. Monash rated him as a factor in his Corps' success in the Battle of Amiens in August and the Battle of the Hindenburg Line in September. The Major General General Staff of the British Fourth Army, of which the Australian Corps was a part during these battles, Major General Archibald Montgomery - Massingberd, was a former instructor of Blamey's at Quetta. He declared himself "full of admiration for the staff work of the Australian Corps." Monash later wrote:
No reference to the staff work of the Australian Corps during the period of my command would be complete without a tribute to the work and personality Brigadier General T.A. Blamey, my Chief of Staff. He possessed a mind cultured far above the average, widely informed, alert and prehensile. He had a infinite capacity for taking pains. A Staff College graduate, but not on that account a pedant, he was thoroughly versed in the technique of staff work, and in the minutiae of all procedure. He served me with an exemplary loyalty, for which I owe a debt of gratitude which cannot be repaid. Our temperaments adapted themselves to each other in a manner which was ideal. He had an extraordinary faculty for self - effacement, posing always and conscientiously as the instrument to give effect my policies and decisions. Really helpful whenever his advice was invited, he never obtruded his own opinions, although I knew that he did not always agree with me.
Blamey's loyalty to Monash would continue after the latter's death in 1931, and would have important consequences. For his services as Corps Chief of Staff, Blamey was appointed Companion of the Order of the Bath in 1919, mentioned in dispatches twice more, and was awarded the French Croix de guerre.
Blamey arrived back in Australia on 20 October 1919, after an absence of seven years, and became director of Military Operations at Army Headquarters in Melbourne. His AIF appointment was terminated on 19 December 1919, but he retained his wartime rank of a brigadier general as an honorary rank. He was promoted to a substantive colonel in January 1920, and in May 1920 was appointed Deputy Chief of the General Staff.
His first major task was the creation of the Royal Australian Air Force (RAAF). The government established a joint Army - Navy board to provide recommendations on the matter, with Blamey and Lieutenant Richard Williams as the Army representatives. Blamey supported the creation of a separate air force, albeit one still subordinate to the Army and Navy. He refused to yield, however, on his opposition to the Navy's demand that Lieutenant Colonel Stanley Goble become its first chief.
In November 1922 Blamey embarked for London to be the Australian representative on the Imperial General Staff. He reported that the "conception of an Imperial General Staff... was absolutely dead". The British Army saw no little use in the concept of a combined staff which could coordinate the defense of the British Empire. He became involved with the development of the Singapore strategy, and he briefed Prime Minister Stanley Bruce on it for the 1923 Imperial Conference, at which it was formally adopted. Even in 1923, though, Blamey was skeptical about the strategy.
When White retired as Chief of General Staff in 1923, Blamey was widely expected to succeed him, as he had as chief of staff of the Australian Corps in France, but there were objections from more senior officers, particularly Major General Victor Sellheim, at being passed over. Instead, the Inspector General, Lieutenant General Sir Harry Chauvel, was made Chief of General Staff as well, while Blamey was given the new post of Second CGS, in which he performed most of the duties of Chief of General Staff.
Seeing no immediate prospects for advancement. Blamey transferred from the Permanent Military Forces to the Militia on 1 September 1925. For the next 14 years he would remain in the Army as a part time soldier. On 1 May 1926 he assumed command of the 10th Infantry Brigade, part of the 3rd Division. Blamey stepped up to command the 3rd Division on 23 March 1931, and was promoted to major general, one of only four Militia officers promoted to this rank between 1929 and 1939. In 1937 he was transferred to the unattached list.
In 1923, the Victoria Police went on strike, and Monash and James McCay established
a Special Constabulary Force to carry out police duties. After the
Chief Commissioner, Alexander Nicholson, resigned for ill health in
1925, Chauvel recommended Blamey for the post. He became Chief
Commissioner on 1 September 1925 for a five year term, with a salary of
£1,500 per annum (A$100,227 in 2008 dollars). Blamey
set about addressing the grievances that had caused the strike, which
he felt "were just, even if they went the wrong way about them". Blamey improved pay and conditions, and implemented the recommendations of the Royal Commission into the strike. He attempted to introduce faster promotion based on merit, but this was unpopular with the Police Association, and was abandoned by his successors. As in the Army, he showed a willingness to adopt new ideas, such as police dogs. He increased the number of police cars equipped with two - way radios from one in 1925 to five in 1930. He also boosted the numbers of policewomen on the force.
Blamey became involved in his first and greatest scandal soon after taking office. During a raid on a brothel in Fitzroy on 21 October 1925, the police encountered a man who produced Blamey's police badge, No. 80. Blamey later said that he had given his key ring, which included his badge, to a friend who had served with him in France, so that the man could help himself to some alcohol in Blamey's locker at the Naval and Military Club. Blamey's story was corroborated by his friend Stanley Savige, who was with him at the time. Blamey protected the man in question, whom he said was married with children, and refused to identify him. He has never been identified, but the description given by the detectives and the brothel owner did not match Blamey.
During the 1920s, Victoria had repressive and restrictive drinking laws, including the notorious six o'clock closing. Blamey took the position that it was the job of the police to enforce the laws, even if they did not support them. He drew a sharp distinction between his personal life and his job. Many members of the public did not agree with this attitude. Blamey's presence in a hotel after closing time was always welcome, as it meant that drinking could continue, for it was known that it would not be raided while he was there; but other citizens felt that it was unjust that they continued to be arrested for breaking the same laws.
As Police Commissioner he defended the actions of the police during the 1928 Waterside Workers' Federation dispute, during which police opened fire, killing a striking worker who was also a Gallipoli veteran, and wounding several others. Blamey's treatment of the unionists was typical of his hard line anti - communist beliefs and as such his relations with left - wing governments were tense. Along with many senior army and ex-army officers, he was a leading member of the clandestine far right wing League of National Security. This was reportedly a response to the rise of communism in Australia. Its members stood ready to take up arms to stop a catholic or communist revolution.
Blamey was re-appointed as Chief Commissioner in 1930, but at a reduced salary of £1,250 per annum. A year later it was reduced still further, to £785, due to cutbacks as a result of the Great Depression. Minnie became an invalid, and by 1930 no longer accompanied him in public. His son Dolf, now an RAAF flying officer, was killed in an air crash at RAAF Base Richmond. Minnie died in October 1935. Blamey was knighted in the 1935 New Year Honours, and in 1936 he was appointed a Commander of the Venerable Order of Saint John.
A second scandal occurred in 1936 when Blamey attempted to cover up details of the shooting of the superintendent of the Criminal Investigation Branch, John O'Connell Brophy, whom Blamey had appointed to the post. Brophy had taken two women friends along with him to a meeting with a police informant. While they were waiting for the informant, they had been approached by armed bandits, and Brophy had opened fire and had himself been wounded. In order to cover up the identities of the two women involved, Blamey initially issued a press release to the effect that Brophy had accidentally shot himself. The Premier, Albert Dunstan, gave Blamey the choice of resigning or being dismissed. The latter meant the loss of pension rights and any future prospects of employment in the Public Service or the Army. Blamey reluctantly submitted his resignation on 9 July 1936.
From March 1938 Blamey supplemented his income by making weekly broadcasts on international affairs on Melbourne radio station 3UZ under the pseudonym "the Sentinel". Blamey and the station's general manager, Alfred Kemsley, felt that Australians were poorly informed about international affairs, and set about raising awareness of matters that Blamey believed would soon impact them greatly. He was appalled at Nazi Germany's persecution of Jews, and saw a clear and growing menace to world peace from Nazi Germany and the Empire of Japan. Blamey's 15 minute weekly talks continued until the end of September 1939, by which time the war that he had warned was coming had started.
In November 1938, Blamey was appointed chairman of the Commonwealth Government's Manpower Committee and Controller General of Recruiting. As such, he laid the foundation for the expansion of the Army in the event of war with Germany or Japan, which he now regarded as inevitable. In 1938 and 1939, he headed a successful recruiting campaign which doubled the size of the part time volunteer Militia from 35,000 in September 1938 to 70,000 in March 1939. On 5 April 1939 he married Olga Ora Farnsworth, a 35 year old fashion artist, at St John's Anglican Church, Toorak, Victoria.
Richard Casey, who had served with Blamey on Gallipoli and in France, and Jo Gullett put Blamey's name forward to Prime Minister Joseph Lyons as
a possible commander in chief in the event of a major war. "We've got
some brilliant staff officers," Casey told Lyons, "but Blamey is a
commander. That's the difference." Lyons initially had concerns about
Blamey's morals, but Casey and Lyons summoned Blamey to a meeting in
Canberra, after which, Lyons designated Blamey for the job. Lyons died
on on 7 April 1939, but was replaced as prime minister by Robert Menzies, another prominent supporter of Blamey's. Two other officers, Major Generals Gordon Bennett and John Lavarack were
considered, and had strong supporters; but both were strong and public
critics of the government's defense policies, whereas Blamey had never
publicly criticized government policy.
On 13 October 1939, a month after the outbreak of the Second World War, Blamey was promoted to lieutenant general and appointed to command the 6th Division, the first formation of the new Second Australian Imperial Force, and received the AIF service number VX1. Menzies limited Blamey's choice of commanders by insisting that they be selected from the Militia rather than the PMF. For brigade commanders Blamey chose Brigadiers Arthur Allen, Leslie Morshead and Stanley Savige. He selected Brigadier Edmund Herring to command the 6th Division artillery, Colonel Samuel Burston for its medical services, and Lieutenant Colonels Clive Steele and Jack Stevens its engineers and signals. All except Allen had previously served with Blamey during his time commanding the 3rd Division in Melbourne. For his two most senior staff officers, he chose Colonel Sydney Rowell and Lieutenant Colonel George Alan Vasey.
In February 1940, the War Cabinet decided to form a second AIF division, the 7th Division, and group the 6th and 7th Divisions together as I Corps, with Blamey as its commander. On Blamey's recommendation, Major General Iven Mackay was appointed to succeed him in command of the 6th Division, while Lieutenant General John Lavarack assumed command of the 7th Division. Blamey took Brigadier Rowell with him as his chief of staff, and picked Major General Henry Wynter as his administrative officer. Blamey flew to Palestine on a Qantas flying boat in June 1940. He refused to allow his troops to perform police duties in Palestine, and established warm relations with the Jewish community there, becoming a frequent guest in their homes.
As commander of the AIF, Blamey was answerable directly to the Minister of Defence,
rather than to the Military Board. He was given a charter based on that
given to Bridges in 1914. Part of his charter required that his forces
remain together as cohesive units, and that no Australian forces were to
be deployed or engaged without the prior consent of the Australian
government. Blamey
was not inflexible and permitted Australian units to be detached when
there was a genuine military need. Because the situation in the Middle
East tended to lurch from crisis to crisis, this resulted in his troops
becoming widely scattered at times. When the crises had passed, however,
he wanted units returned to their parent formations. This resulted in conflicts with British commanders. The first one occurred in August 1940 when the British Commander in Chief Middle East, General Sir Archibald Wavell and Prime Minister of the United Kingdom, Winston Churchill, ordered the 16th Infantry Brigade forward to Egypt. Blamey refused on the grounds that the brigade was not yet fully equipped, but eventually compromised.
I Corps assumed responsibility for the front in Cyrenaica on 15 February 1941, but within days Blamey was informed that his troops would be sent to Greece. Blamey has been criticized for allowing Australian troops to be sent on the expedition to Greece when he knew it was extremely hazardous after he was told that Menzies had approved. Blamey insisted, however, on sending the veteran 6th Division first instead of the 7th Division, resulting in a heated argument with Wavell, which Blamey won. Blamey was under no illusions about the odds of success and immediately prepared plans for an evacuation. His foresight and determination saved many of his men but he lost credibility when he chose his son to fill the one remaining seat on the aircraft carrying him out of Greece. The campaign exposed deficiencies in the Australian Army's training, leadership and staff work that had passed unnoticed or had not been addressed in the Libyan Campaign. The pressure of the campaign opened a rift between Blamey and Rowell, which was to have important consequences. While Rowell and Brigadier William Bridgeford were extremely critical of Blamey's performance in Greece, this opinion was not widely held. Wavell reported that "Blamey has shown himself a fine fighting commander in these operations and fitted for high command."
The political fallout from the disastrous Battle of Greece led to Blamey's appointment as Deputy Commander in Chief Middle East in April 1941. However, to ensure that command would not pass to Blamey in the event of something happening to Wavell, the British government promoted Sir Henry Maitland Wilson to general in June. Soon afterwards, Wavell was replaced by General Sir Claude Auchinleck. Blamey was subsequently promoted to the same rank on 24 September 1941, becoming only the fourth Australian to reach this rank, after Monash, Chauvel and White. During the Syrian campaign against the Vichy French, Blamey took decisive action to resolve the command difficulties caused by Wilson's attempt to direct the fighting from the King David Hotel in Jerusalem by interposing Lavarack's I Corps headquarters.
During Blamey's absence in Greece, AIF units had become widely scattered, with forces being deployed to Cyprus, and the 9th Division and the 18th Infantry Brigade coming under siege in Tobruk. Blamey would spend the rest of the year attempting to reassemble his forces. This
led to a clash with Auchinleck over the relief of Tobruk, where Blamey
accepted Burston's advice that the Australian troops there should be
relieved on medical grounds. Menzies, and later John Curtin, backed Blamey, and Auchinleck and Churchill were forced to give way. For his campaigns in the Middle East, Blamey was created a Knight Commander of the Order of the Bath on 1 January 1942. He was Mentioned in Dispatches for the eighth time, and was awarded the Greek War Cross, First Class.
The defense of Australia took on a new urgency in December 1941 with the entry of Japan into the war. Within the Army there was a concern that Bennett or Lavarack would be appointed as Commander in Chief. In March 1942, Vasey, Herring and Steele approached Army Minister Frank Forde with a proposal that all officers over the age of 50 be immediately retired and Major General Horace Robertson be appointed Commander in Chief. This "revolt of the generals" collapsed with the welcome news that Blamey was returning from the Middle East to become Commander in Chief Australian Military Forces.
General Douglas MacArthur arrived in Australia in March 1942 to become Supreme Commander South West Pacific Area (SWPA). In addition to his duties as Commander in Chief, Blamey became Commander of Allied Land Forces, South West Pacific Area. In the reorganisation that followed his return to Australia on 23 March, Blamey appointed Lavarack to command the First Army, Mackay to command the Second Army, and Bennett to command the III Corps in Western Australia. Vasey became Deputy Chief of the General Staff (DCGS), while Herring took over Northern Territory Force, and Robertson became commander of the 1st Armoured Division. Blamey's Allied Land Forces Headquarters (LHQ) was established in Melbourne, but after MacArthur's General Headquarters (GHQ) moved to Brisbane in July 1942, Blamey established an Advanced LHQ in St Lucia, Queensland.
The Allied command structure was soon put under strain by Australian reverses in the Kokoda Track Campaign. MacArthur was highly critical of the Australian performance, and confided to the Chief of Staff of the United States Army, General George Marshall, that "The Australians have proven themselves unable to match the enemy in jungle fighting. Aggressive leadership is lacking." MacArthur told Curtin that Blamey should be sent up to New Guinea to take personal command of the situation. Curtin
later confessed that "in my ignorance (of military matters) I thought
that the Commander in Chief should be in New Guinea." Jack Beasley suggested that Blamey would make a convenient scapegoat: "Moresby is going to fall. Send Blamey up there and let him fall with it!"
Blamey felt he had no choice, but his assumption of command of New Guinea Force sat uneasily with Rowell, the commander of I Corps there, who saw it as displaying a lack of confidence in him. A petulant Rowell would not be mollified, and, after a series of disagreements, Blamey relieved Rowell of his command, replacing him with Herring. More reliefs followed. Herring relieved Brigadier Arnold Potts of the 21st Infantry Brigade, replacing him with Brigadier Ivan Dougherty on 22 October. Five days later, Blamey replaced Allen as the 7th Division's commander with Vasey. Nor were generals the only ones to be removed. Blamey cancelled Chester Wilmot's accreditation as a war correspondent in October 1939 for spreading a false rumour that Blamey was taking payments from the laundry contractor at Puckapunyal. Wilmot had later been reinstated, but on 1 November 1942, Blamey again terminated Wilmot's accreditation, this time for good.
During a speech to the 21st Infantry Brigade on 9 November 1942:
[Blamey] said that the Jap was like a gorilla; he would get into a hole and he would not surrender ; while in his hole and protected by it he would kill; to be dealt with he had to be got out of his holes and put on the run. Blarney added that it was like shooting rabbits: while the rabbits were in their burrows they could not be shot; they had to be got on the run and then the man with the gun could get them. "It never entered my head as I stood there on parade that the general had any idea he was being offensive, or that he intended to be so, " wrote Brigadier Dougherty (then a newcomer to the brigade) afterwards. "But the brigade gave to what he said the interpretation that 'they ran like rabbits'. This interpretation of what he said spread throughout New Guinea and indeed back home, and resulted in bitter feelings. Following his address to the whole brigade [General Blamey] addressed the officers separately. He was direct with them and said that a few officers in the brigade had failed. This caused bitterness. But after both addresses Blamey told me that he thought highly of the brigade, and repeated to me what he had told the whole brigade — that I, as their new brigade commander, would be very proud of them."
The implication of cowardice was seen as contrasting with his own inability to stand up to MacArthur and the Prime Minister. Rowell felt that Blamey "had not shown the necessary 'moral courage' to fight the Cabinet on an issue of confidence in me." However, when American troops were checked at in the Battle of Buna - Gona, Blamey turned the tables on MacArthur and "frankly said he would rather send in more Australians, as he knew they would fight... a bitter pill for MacArthur to swallow".
In January 1943, Blamey visited the Buna - Gona battlefield, surprising Vasey at how far forward he went, seemingly unconcerned about his safety. Blamey was impressed by the strength of the Japanese fortifications that had been captured, later telling correspondents that Australian and American troops had performed miracles.
At the Battle of Wau in January 1943, Blamey won the battle by acting decisively on intelligence, shifting the 17th Infantry Brigade from Milne Bay in time to defeat the Japanese attack. The official historian, Dudley McCarthy, later wrote:
At the very peak of this leadership development was General Blamey himself. His greatness was demonstrated almost daily by a knowledge unparalleled in Australia of how an army should be formed and put to work; by his exercise of the vital field command at the same time as he kept within his grasp a vastly detailed control of the Australian Army as a whole; by his sagacity and strength in meeting the rapidly changing demands of a difficult political situation; by his ability speedily to encompass the requirements of the new war and plan far ahead of the events of the day as he controlled them; by his generally unappreciated humanity.
For the Papuan Campaign, MacArthur awarded Blamey the American Distinguished Service Cross, and Blamey was created a Knight Grand Cross of the Order of the British Empire on 28 May 1943. This was unusual as it was the Australian Labor Party's
policy not to award knighthoods. Blamey's and Herring's knighthoods
would be the last that the Labor government would award to Australian
soldiers.
The relationship between MacArthur and Blamey was generally good, and they had great respect for each other's abilities. MacArthur's main objection was that as Commander in Chief AMF as well as Commander Allied Land Forces, Blamey was not wholly under his command. Gavin Long argued that:
Nothing substantial would have been gained by this arrangement and much would have been lost: notably the existence of a single commander who could advise the Australian Government on all the problems of its army and be answerable to that Government for the manner in which it was employed both at home and in the field.
The next operation was MacArthur's Operation Cartwheel, an advance on the major Japanese base at Rabaul. The Australian Army was tasked with the capture of the Huon Peninsula. Blamey was ordered to again assume personal command of New Guinea Force. His concept, which he developed with Herring and Frank Berryman, who had replaced Vasey as DCGS, was to draw the Japanese forces away from Lae with a demonstration against Salamaua, and then capture Lae with a double envelopment. Blamey remained a devotee of new technology. His plan called for the use of the landing craft of the 2nd Engineer Special Brigade, and he intended to cross the Markham River with the aid of paratroops. Supplies would be brought across the river using DUKWs, a relatively new invention. He also attempted to acquire helicopters, but met resistance from the RAAF, and they were never delivered. MacArthur accepted a number of changes that Blamey made to his strategy, the most notable of which was probably moving the landing on New Britain to before Blamey's attack on Madang.
The campaign started well, with Lae captured well ahead of schedule. Blamey then handed over command of New Guinea Force to Mackay and returned to Australia. The 7th Division then advanced through the Ramu Valley while the 9th Division landed at Finschhafen. The campaign then slowed owing to a combination of logistical difficulties and Japanese resistance. Blamey responded to a request from Mackay to relieve Herring, whose chief of staff had been killed in an aircraft accident. He immediately sent Morshead. In February 1944 there was criticism in Parliament of the way that Blamey had "side tracked" various generals, the names of Bennett, Rowell, Mackay, Wynter, Herring, Lavarack, Robertson, Morshead and Clowes being mentioned. Blamey responded that
We had twelve divisions to fight the Jap. On arrival of other equipment, other considerations came in and we now have six divisions. Can you tell me what should have been done with the surplus generals? I do know that on every occasion I proposed to terminate a general's appointment, politicians have tried to stop it.
The Minister for the Army, Frank Forde also criticised Blamey for having too many generals. Blamey could only reply that the Australian Army had one general for 15,741 men and women compared to one per 9,090 in the British Army.
Blamey was annoyed by the media campaign run against him by William Dunstan and Keith Murdoch of the The Herald and Weekly Times newspaper group; but success in New Guinea led to a change of heart at the newspaper, and Blamey even accepted a dinner invitation from Murdoch in 1944. There was another victory, though, far more significant. The Army had taken heavy casualties from malaria in the fighting in 1942. Blamey took the advice of Edward Ford and Neil Hamilton Fairley, and strongly backed their, ultimately successful, efforts to control the disease. To acquaint himself with the issues, Blamey read through Manson's Tropical Diseases, the standard medical textbook on the subject. Blamey also promoted the work of Howard Florey on the development of pennicilin, and wrote to Curtin urging that £200,000 be earmarked for Florey's vision of a national institute for medical research in Canberra, which ultimately became the John Curtin School of Medical Research.
Blamey
was involved in discussions with the government over the size of the
Army to be maintained. Now that the danger of invasion of Australia had
passed, the government reconsidered how the nation's resources,
particularly of manpower, should be distributed. Blamey pressed for a
commitment to maintain three AIF divisions, as only they could legally
be sent north of the equator where the final campaigns would be fought.
He urged that the Empire Air Training Scheme be
curtailed, and opposed MacArthur's proposal to use the Australian Army
primarily for logistic support and leave combat roles principally to
American troops.
On 5 April 1944, Blamey departed for San Francisco on board USS Lurline for the first leg of a voyage to attend the 1944 Commonwealth Prime Ministers' Conference in London as part of Curtin's party. The journey was made by sea and rail due to Curtin's fear of flying. Also on board the ship were American military personnel returning to the United States, and some 40 Australian war brides. Blamey "was always attractive to women and attracted by them. Advancing years had not reduced either his taste for amorous adventures or his capacity to enjoy them", and he brought with him several cases of spirits. The rowdy goings-on in Blamey's cabin did not endear him to the Prime Minister, who was a reformed alcoholic. The party travelled by train to Washington, DC, where Blamey was warmly greeted by the Joint Chiefs of Staff, and briefed the Combined Chiefs of Staff on the progress of the war in SWPA. In London Blamey had a series of meetings with the Chief of the Imperial General Staff, Field Marshal Sir Alan Brooke, and was briefed on Operation Overlord by General Sir Bernard Montgomery and Air Chief Marshal SirArthur Tedder. Blamey was disappointed to have to turn down an offer to accompany the invasion as a guest of General Dwight Eisenhower because Curtin feared that the invasion would lead to retaliatory German bombing, and wanted to be far away before it started.
As a matter of policy, Curtin wanted Australian forces to be involved in liberating New Guinea. MacArthur therefore proposed that Australian troops relieve the American garrisons on New Britain, Bougainville and New Guinea. However, MacArthur baulked at Blamey's proposal to replace the seven American divisions with just seven Australian brigades, resulting in the 6th Division being employed as well. The larger garrisons permitted offensive operations, and demanded them if the 6th Division was to be freed for employment elsewhere. These operations aroused considerable criticism on the grounds that they were unnecessary, that the troops should have been employed elsewhere, and that the Army's equipment and logistics was inadequate. Blamey vigorously defended his aggressive policy to reduce the bypassed Japanese garrisons and free the civilian population, but some felt that he went too far in putting his case publicly in a national radio broadcast. He was also criticised for not spending enough time in forward areas, although he spent more than half his time outside Australia in 1944, and between April 1944 and April 1945 travelled 65,000 miles (105,000 km) by air, 7,000 miles (11,000 km) by sea and 7,500 miles (12,100 km) by land. Blamey urged that the 7th Division not be sent to Balikpapan, an operation that he regarded as unnecessary. On this occasion, he was not supported by the government, and the operation went ahead as planned.
Gavin Long wrote that:
Some of the reasons for Blamey's lack of popularity with several of the Ministers and part of the public can probably be discovered only by exploring traits in the Australian national character of those days; other reasons are easier to unearth. Throughout the war Blarney commanded an army whose senior appointments were shared between regular and citizen officers. In some places this created tensions and rivalry which adversely affected Blamey's reputation, through no fault of his own; also the ambiguous relationship between his headquarters and MacArthur's led to disagreements of which at least the Ministers were aware. A man of greater tact, however, could have managed these problems more smoothly. But Blamey was not a man of great tact.
On 2 September 1945, Blamey was with MacArthur on USS Missouri and signed the Japanese surrender document on behalf of Australia. He then flew to Morotai and personally accepted the surrender of the remaining Japanese in the South West Pacific. He insisted that Australia should be represented in the Allied occupation of Japan.
MacArthur abolished SWPA on 2 September 1945, and on 15 September Blamey offered to resign. The war was over, and the post of Commander in Chief was now a purely administrative one. His offer was not accepted, but on 14 November, the government abruptly announced that it had accepted his resignation, effective 30 November. A farewell party was held in Melbourne, which was attended by 66 brigadiers and generals. Blamey was given time to write up his dispatches, and was formally retired on 31 January 1946. Frank Forde asked Blamey if he wanted anything in way of recognition for his services, and Blamey asked for knighthoods for his generals, but Forde could not arrange this. In the end, Forde decided to gift Blamey his Buick staff car, which had clocked up 50,000 miles (80,000 km) in the Middle East and the South West Pacific.
Blamey returned to Melbourne, where he devoted himself to business affairs, to writing, and to promoting the welfare of ex-service personnel. In September 1948, Blamey paid a visit to Japan, where he was warmly greeted on arrival at Iwakuni by Horace Robertson, the commander of the British Commonwealth Occupation Force, who also provided an RAAF honour guard. MacArthur sent his own aircraft, the Bataan to collect Blamey and bring him to Tokyo, where he met Blamey at the airport and gave him another warm greeting. In the late 1940s Blamey became involved with The Association, an organisation similar to the earlier League of National Security, which was established to counter a possible communist coup. He was the head of the organisation until ill health forced him to stand down in favour of Morshead in 1950.
Menzies became prime minister again in December 1949, and he resolved that Blamey should be promoted to the rank of field marshal, something that had been mooted in 1945. The recommendation went via the Governor General, William McKell, to the War Office in London, which replied that a dominion officer could not be promoted to the rank. Menzies pointed out that Jan Smuts already had. The War Office then claimed that Blamey could not be promoted to field marshal because he was a retired officer, which was not true. Menzies then restored Blamey to active duty. Blamey was duly promoted to field marshal in the King's Birthday Honours of 8 June 1950.
A few days afterwards, Blamey became seriously ill and was forced to receive his field marshal's baton from the Governor General, William McKell, in his hospital bed at the Heidelberg Repatriation Hospital. He died there of hypertensive cerebral haemorrhage on 27 May 1951. His body lay in state at the Shrine of Remembrance, where 20,000 people filed past. Crowds estimated at 300,000 lined the streets of Melbourne at his state funeral. Ten of his lieutenant generals served as pallbearers: Frank Berryman, William Bridgeford, Edmund Herring, Iven Mackay, Leslie Morshead, John Northcott, Sydney Rowell, Stanley Savige, Vernon Sturdee and Henry Wells. His body was cremated at the Fawkner Crematorium and Memorial Park.
Blamey is honoured in Australia in various ways, including a square named after him which is situated outside the Russell Offices headquarters of the Australian Defence Force and Department of Defence in the national capital, Canberra. A statue of Blamey stands in Kings Domain, Melbourne, on the corner of Government House Drive and Birdwood Avenue, opposite that of John Monash. It was sculptured from granite and bronze by Raymond B. Ewers and presented to the city in February 1960. Controversially, Blamey is mounted on a jeep instead of the traditional horse. Blamey Barracks at Kapooka, where the Army Recruit Training Centre is located, is also named in his honor, as is Blamey Street in North Ryde, New South Wales. His papers are held in the Australian War Memorial, where his field marshal's baton is on display.